今回は、WordPressテーマ『Lightning』で子テーマ設定しました。
これまでは、配布してされてる子テーマを使用していたのですが、
親テーマの『Lightning』をインストールしていても
親テーマが存在しません。←のような表示が出るようになったので
子テーマを作成してみました♪
意外と簡単。
スポンサードリンク
子テーマ設定方法
テーマをカスタマイズする際に、そのままのテーマを使用していると
アップデートの際に、ファイルが上書きされてカスタマイズしたファイルが消えてしまう事があるとの事。
なので、親テーマのアップデートでも崩れないサイト作りのために
子テーマを作成して、カスタマイズは子テーマで行います。
今回は、WordPressテーマ『Lightning』での、子テーマ設定方法です。
まずは、親テーマと同じ階層に、子テーマのフォルダを作り、
親テーマの『style.css』『functions.php』を
作成した子テーマフォルダへコピペします。
今回は子テーマのフォルダ名を『lightning-child』にしています。
まずは、CSSの中身を書き換えます。
書き換えに必要な部分は、
・Theme Name ⇒ 子テーマ名へ
・Template ⇒ 親テーマ名のフォルダ名
/*
Theme Name: Lightning Child
Theme URI: https://lightning.nagoya
Template: lightning
Description: Lightning is a very simple & easy to customize theme which is based on the Bootstrap. It is also very friendly with custom post types and custom taxonomies. When you add a new one, the breadcrumbs will be adjusted and posts will look beautifully without editing or adding a template files.
Author: Vektor,Inc.
Author URI: https://www.vektor-inc.co.jp
Version:4.3.0
Tags: two-columns, one-column, right-sidebar, custom-colors, custom-menu, editor-style, theme-options
License: GNU General Public License v2 or later
License URI: http://www.gnu.org/licenses/gpl-2.0.html
Text Domain: lightning-child

Lightning WordPress theme, Copyright (C) 2015-2017 Vektor,Inc.
Lightning WordPress theme is licensed under the GPL.
*/
続いて、functions.phpを書き換えます。
下記のコードを記載します。
<?php
add_action( 'wp_enqueue_scripts', 'theme_enqueue_styles' );
function theme_enqueue_styles() {
  wp_enqueue_style( 'parent-style', get_template_directory_uri() . '/style.css' );
  wp_enqueue_style( 'child-style', get_stylesheet_directory_uri() . '/style.css', array('parent-style')
);
}
?>
子テーマを認識させる記述です。
上の『style.css』『functions.php』が出来たら、
FTPで親テーマと同じ階層へアップロードします。
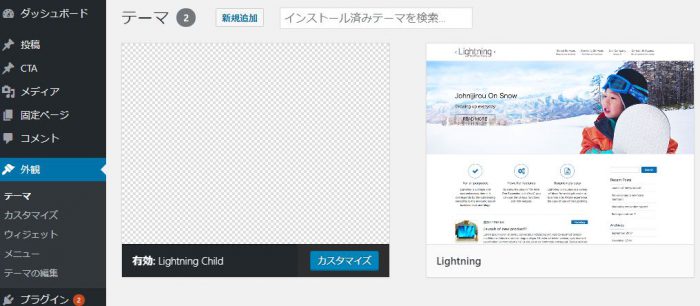
WordPressの管理画面の、外観>テーマ で確認すると
作成したテーマがあるので、有効にします。
子テーマ内のファイルは『style.css』『functions.php』の2ファイルだけですが、
親テーマのファイルをテンプレートとして引き継いでいるので、
親テーマと同じ内容で作成できているはずです。
カスタマイズは子テーマ内のファイルでカスタマイズを行います。
『style.css』『functions.php』以外で、変更したいファイルが出来た際には、
子テーマ内へ追加して、変更していきます。
スポンサードリンク